Your complete guide to the SEPA document for payments and collections
2026-01-27
A SEPA document is, in short, an electronic file that gives your bank all the instructions it needs to execute a batch of transfers or collections. It usually comes in a format called XML and works like a kind of digital passport for your money, ensuring each operation moves quickly and securely across the SEPA zone.
The role of the SEPA document in your finances

Think of this situation: you need to send 100 transfers to pay suppliers or, on the other hand, collect 500 direct debits from your clients. Can you imagine doing it by hand, one by one? It would be madness—a slow process and a breeding ground for errors. This is exactly where the SEPA document becomes your best ally, because it lets you group all those operations in a single standardised file that your bank processes in one go.
This system not only saves you valuable time but also adds a layer of security and efficiency that is vital for any business today. Thanks to SEPA (Single Euro Payments Area) unifying payments across Europe, the barriers and complications of the old banking systems in each country are gone.
In essence, a SEPA document is the modern version of a bank batch. It is a file that contains a set of payment or collection orders that your software generates and your bank executes in bulk to optimise your cash flow.
The two pillars of SEPA operations
To really master what a SEPA document is, you need to understand its two main uses. Basically, they define whether you are sending or receiving money. Each has its own format and a very specific purpose.
-
SEPA Credit Transfers (SCT): Used to send money. They are the payment orders your company issues to pay salaries, supplier invoices or any other outlay.
-
SEPA Direct Debits (SDD): Designed to receive money. They are the collection orders you initiate on a client’s account to collect a fee, subscription or any recurring invoice—always with their signed consent.
Transfers vs direct debits: pushing or pulling money?
Although both are managed with a SEPA document, their functions are opposite. Understanding what differentiates them is the first step to having real control over your cash flows. A transfer is an action of “pushing” money from your account to another, while a direct debit “pulls” money from a third party’s account to yours.
To make it clearer, here is a table that summarises the key differences.
Key differences between SEPA transfers and direct debits
| Feature | SEPA Credit Transfers (SCT) | SEPA Direct Debits (SDD) |
|---|---|---|
| Purpose | Send money (pay) | Receive money (collect) |
| Initiator | The payer (debtor) | The beneficiary (creditor) |
| Key requirement | Having the funds | SEPA mandate signed by the client |
| Practical example | Pay your employees’ salaries | Collect the monthly gym fee |
The good news is that the speed of these operations has improved enormously. In fact, in Spain, SEPA instant transfers (SCT Inst) already represent more than 63% of the total, making them the preferred method. This means most payments and collections are settled in seconds.
Knowing how to create and manage a SEPA document gives you much greater control over your finances, removes a lot of administrative work and minimises errors that can cost time and money. If you want to go deeper, you can find more on SEPA and how it works in our help articles.
The internal structure of a SEPA XML file
Think of a SEPA XML file as an official form, but designed for a machine to understand: your bank’s system. Instead of boxes and handwritten fields, it uses tags and data organised in a very strict hierarchy, almost like a family tree. Each piece of data has its exact place and role, and if one piece fails, the whole operation stops.
Understanding this internal logic is key. It is not about learning to program but about understanding why each piece of data you put in your Excel ends up in a specific place in the file. This knowledge gives you the power to spot an error instantly and fix it before it becomes a headache.
The three levels of a SEPA document
Every SEPA file is organised in three main blocks or levels. Each contains the previous one, forming a structure that goes from the most general to the most specific, like nesting dolls.
-
Group A - Message Header (Group Header): Basically the cover of the document. Here it identifies who sends the order (your company) and assigns a unique code to the whole batch, the famous MsgId. Think of it as a package tracking number; it is the global reference for the entire batch.
-
Group B - Payment Information: This block groups the common details of the batch. Here it defines whether they are transfers or direct debits, the execution date and your company’s bank account details from which money will go out or come in. This block also has its own identifier, PmtInfId.
-
Group C - Individual Transactions (Transaction Information): This is the heart of the matter. It is the most detailed level and contains one entry per payment or collection you are going to make. Each of these transactions specifies the client’s or supplier’s IBAN, the exact amount, the reference and, for direct debits, the SEPA mandate reference that authorises it.
Visually, the structure is simple: a single Group A wraps a single Group B, which in turn contains multiple Group Cs, one per individual operation.
Mandatory fields you cannot ignore
Within this hierarchy, certain fields are make-or-break for the file. An error or omission in any of them will make the bank reject it outright. It is like trying to send a letter without the recipient’s address; it simply will not arrive.
A well-built SEPA XML file is like an orchestra where each instrument (each piece of data) plays its note at the right moment. If a single mandatory field is missing or wrong, the melody breaks and the bank cannot process the order, causing delays in your payments and collections.
Pay close attention to the following data, because they are the cause of 90% of rejections:
-
Unique identifiers (MsgId and PmtInfId): Every batch you send must have new identifiers you have never used before. Reusing them is a very common mistake that banking systems catch immediately.
-
IBAN and BIC (when required): The IBAN must be in the correct format for its country. Although BIC is no longer mandatory for operations within the European Economic Area, some banks still require it for certain transactions. When in doubt, it is good practice to include it.
-
Execution date (ReqdColltnDt / ReqdExctnDt): The date on which you want the bank to move the money. It must follow the strict format YYYY-MM-DD and be a valid future date.
-
Transaction amount (InstdAmt): Watch out here: it must always use a full stop as the decimal separator, never a comma. An amount like “1,234.56” will be rejected. The correct format is “1234.56”.
Mastering this structure gives you a huge advantage. Instead of seeing the SEPA document as an indecipherable black box, you start to understand it as an ordered, predictable system. This not only makes it easier to create files but also makes you an expert at diagnosing problems, ensuring your company’s money flows without interruption.
The SEPA mandate as the basis for direct debits
If you think of a SEPA document as the vehicle you use to collect, the SEPA mandate is the key that starts it. Without this prior authorisation, any attempt to collect is worthless and can be returned immediately. It is not just a signed piece of paper; it is the legal basis—the explicit permission your client gives you to initiate charges on their account.
Think of it as a kind of “contract of trust” between your company and your client. By signing it, the debtor not only accepts the payment but also recognises your right to initiate it, often on a recurring basis. That is why correct management, storage and custody are absolutely crucial. A lost or badly completed mandate is a direct invitation to returns, disputes and, in short, cash flow problems.
What information a SEPA mandate must include
For a mandate to be valid and comply with the regulation, it must contain a set of mandatory fields. These data identify beyond doubt the relationship between the creditor (you) and the debtor (your client). The absence of any one of them invalidates it completely.
The elements that cannot be missing are:
- Creditor identifier: A unique code that identifies you as the company that will issue the collections.
- Unique Mandate Reference (UMR): An alphanumeric code that you assign to identify each mandate. It is like the ID of that specific agreement.
- Debtor data: Their full name, address and, most importantly, their bank account number in IBAN format.
- Payment type: It must be clear whether the mandate is for recurring payments (e.g. a monthly subscription) or for a single one-off payment.
- Date and signature: The document must be dated and signed by the bank account holder.
Mandate management is not a simple administrative task; it is a fundamental pillar of your business’s financial security. A well-managed mandate prevents more than 90% of returns due to lack of authorisation and strengthens the relationship with the client, based on transparency and legal compliance.
CORE scheme vs B2B scheme
Not all direct debit collections are the same. The SEPA system establishes two main schemes, and choosing the right one is essential to secure your collections and know where you stand with your clients’ right to return.
The following diagram shows the basic hierarchy of a SEPA direct debit file, where each individual transaction is linked to a specific mandate.
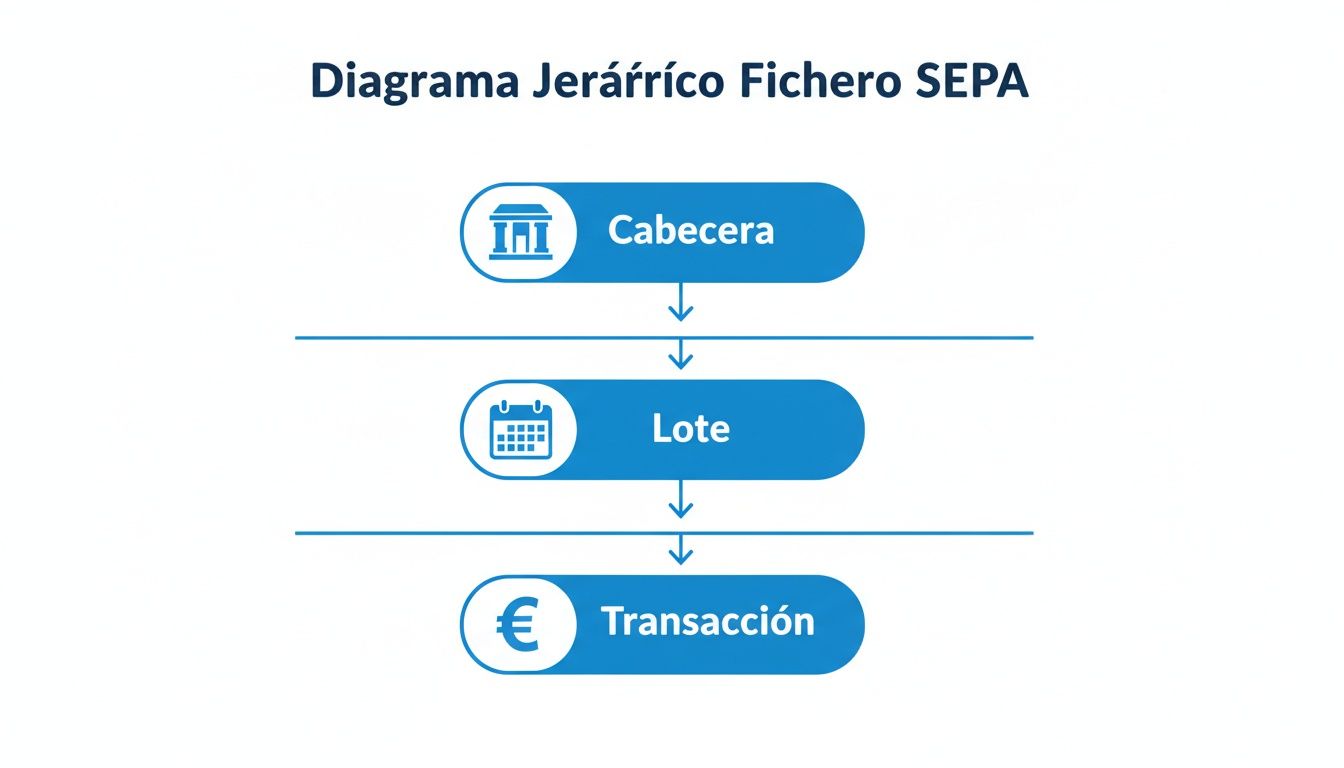 This structure helps visualise how the general information (Header and Batch) gives way to individual operations (Transaction), each of which depends directly on the validity of the SEPA mandate that backs it.
CORE scheme: the standard for everyone
The SEPA Direct Debit CORE scheme is the most widespread and versatile. It works for collecting from any type of client—individuals, self-employed or companies. Its main feature is that it is designed to protect the consumer: the client has 8 weeks to return an authorised direct debit, with no need to give any explanation.
Moreover, if the client can prove they never signed a valid mandate, that return period extends to 13 months. This flexibility makes it the ideal option for services aimed at the general public.
B2B scheme: for businesses only
The SEPA Direct Debit B2B (Business-to-Business) scheme, as the name suggests, is intended exclusively for operations between companies and/or the self-employed. Its great advantage is the strong security it gives you as the collector. Once the debtor has authorised the mandate and communicated it to their bank, they lose the right to return the direct debit.
This practically eliminates the risk of non-payment due to return, which is a huge relief. However, this scheme requires an extra step: the debtor must explicitly inform their bank of the existence of this mandate before the first collection is issued. The choice between CORE and B2B is therefore not trivial; it depends directly on your business model and the type of client you work with.
How to create your SEPA file from a spreadsheet

Creating a SEPA document does not have to be an impossible mission reserved for IT experts. In fact, the starting point for most companies is a tool you already know: a simple Excel spreadsheet or a CSV file. This is the most direct and familiar way to organise all the information before giving it the XML format your bank requires.
Think of it like this: your spreadsheet is the draft of an official form. If you prepare the data well in that draft, filling in the final form will be straightforward. The key to the whole process is how you structure those columns from the start, making sure each piece of information is exactly where it should be.
Structuring your spreadsheet for success
The first step is to design a table with the right columns for the type of file you need—whether for sending transfers or issuing direct debits. The logic is fairly similar in both cases: each row will be one operation (one payment or collection) and each column one specific piece of data for that operation.
At minimum, your table should have these essential columns:
- Recipient/client name: The full name of the person or the legal name of the company.
- IBAN: The full account number, with no spaces or hyphens. Clean and direct.
- Amount: The amount of the operation. Remember to always use a full stop as the decimal separator, not a comma.
- Reference: A short, clear description of the transaction that the other party will see on their statement.
- Mandate reference (direct debits only): The UMR code that identifies the collection authorisation the client signed for you.
- Mandate date (direct debits only): The exact day the client gave you their permission.
Having this information well ordered will not only make your life easier when converting the file but will also serve as a clear, auditable record of all your operations. If you want a more detailed guide, you can read this article on what a SEPA direct debit CSV file should contain.
Practical tips to avoid the usual errors
Preparing this spreadsheet is the most delicate moment. A small mistake here—an empty cell or wrong format—and the bank will return the entire batch. Fortunately, most of these mistakes are easy to avoid if you keep a couple of things in mind.
Think of your spreadsheet as the foundations of a house. If the foundations are solid (clean, correct data), the house (your SEPA XML file) will be stable and functional. But if there are cracks in the base, the whole structure wobbles.
To make your foundations rock solid, follow these tips:
-
No blank mandatory cells: Double-check that columns like IBAN, amount and name are complete in every row. A single empty cell can cause that specific operation to be rejected.
-
Consistent date format: Dates, such as the mandate signature date, must have a consistent format. Ideally DD/MM/YYYY or YYYY-MM-DD so any system can read them without problems.
-
Validate IBANs first: This is the golden rule. An incorrect IBAN is grounds for immediate rejection. Run your IBAN lists through an online validator before you even start; it will save you a lot of headaches.
-
Watch out for special characters: Avoid using symbols like “€”, “#” or “&” in text fields such as the reference or name. The simpler the text, the better banking systems will process it.
The conversion: from spreadsheet to XML file
Once your spreadsheet is reviewed and perfect, the magic moment arrives. This is where specialised tools like ConversorSEPA come in, doing the heavy lifting: taking your data table and turning it into a valid XML file ready to send to the bank.
The process is very simple: you upload your Excel or CSV file, tell the tool which column corresponds to each SEPA field (though it often detects this itself), and in seconds you have your SEPA document in XML format ready to download.
This conversion saves you hours of fighting with technical formats and, most importantly, gives you the peace of mind that the file meets all SEPA standard requirements. The tool does not just transform the data; it validates it, acting as a final quality check before you hit send in your online banking.
How to fix the most common errors in SEPA files
Having the bank return a SEPA file is much more than a setback. It can mean salaries do not arrive on time, a key supplier does not get paid or your clients’ direct debit payments are delayed. It is a spanner in the works of your cash flow.
The good news is that most of these rejections are due to a handful of very specific, and fortunately easy to avoid, mistakes.
The key is to get ahead of the problem. Instead of waiting for the bank to tell you, you can run some simple quality checks before sending any SEPA document. You will see how your operations start to flow without interruption.
Quick diagnosis of the most common failures
Imagine the bank’s validation system as an extremely strict customs check. If a single one of your documents does not meet all the rules, it simply stays out. Let us break down the most typical problems and how to fix them in practice.
1. Incorrect or malformed IBAN
This is undoubtedly the star error. A single wrong digit, an extra character or the absence of the country code (e.g. “ES” for Spain) is enough to bring down the whole operation.
- Likely cause: Almost always due to human error when typing data or copying and pasting from different sources without checking.
- Recommended solution: Prevention is your best ally. Before generating the file, run your data through an IBAN validator. Many conversion tools, like ConversorSEPA, already include this check as standard, catching any incorrect structure immediately. You can also use our standalone IBAN validator to test individual accounts before they ever reach your SEPA file.
2. Missing BIC code
Although for operations within the European Economic Area the BIC code (also called SWIFT) is no longer mandatory, the reality is that some older banking systems or certain specific transactions may still require it. If you do not include it, you may get an unpleasant surprise.
- Likely cause: Assuming BIC is no longer needed at all.
- Recommended solution: When in doubt, include it. There are many free online tools that give you the BIC from a valid IBAN. Adding that column to your spreadsheet is a very simple step that can save you a lot of headaches.
Modern SEPA conversion tools act as a prior “quality control”. They do not just transform your data; they validate the IBAN structure, amount format and date consistency, preventing more than 95% of common errors before the file reaches the bank.
Subtle but equally critical errors
Beyond pure banking data, there are other mistakes that, although they seem less obvious, are just as paralysing. Here, the devil is in the format details.
3. Inconsistencies with the SEPA mandate
When it comes to direct debits, each collection must be tied to its corresponding mandate impeccably. A mistake in the mandate reference (the famous UMR) or in the signature date, and the bank’s system will not be able to verify the client’s authorisation.
- Likely cause: The reference in your XML file does not match letter for letter the one you have on record, or the collection date is before the date the mandate was signed.
- Recommended solution: It is essential to maintain a centralised, clean and up-to-date mandate database. When preparing your Excel, make sure these data are copied exactly, with no changes, and that the dates make sense.
4. Wrong decimal separator
This is a classic for anyone who works with Excel. The SEPA XML standard is strict: amounts must use a full stop (.) as the decimal separator. The problem is that the regional settings on many computers in Spain use a comma (,).
- Likely cause: Exporting data directly from an Excel set up to use commas. An amount like “150,25” will be rejected outright.
- Recommended solution: Before converting the file, check the amount column and use “Find and Replace” to change all commas to full stops. Specialised platforms often do this correction automatically, but it never hurts to know.
Common errors table: diagnosis and solution
To have everything to hand, we have prepared this table that summarises the most common failures, why they happen and how to fix them so your batches are never returned.
| Common error | Likely cause | Recommended solution |
|---|---|---|
| Invalid IBAN | Manual transcription error, wrong digit or missing country code (e.g. “ES”). | Use an online IBAN validator or a tool that does it automatically before generating the file. |
| Wrong mandate reference | The reference (UMR) in the file does not match the one on the mandate signed by the client. | Keep an up-to-date mandate database and verify that data are copied without errors. |
| Incorrect amount format | Using comma (,) as decimal separator instead of full stop (.). | Check the amount column in Excel/CSV and replace all commas with full stops before conversion. |
| Missing BIC/SWIFT code | BIC is omitted in transactions where the receiving bank still requires it. | Always include BIC if you have it. It can easily be obtained from the IBAN using online tools. |
| Illogical direct debit date | The collection date is before the mandate signature date or is a past date. | Ensure dates are consistent and the execution date is always in the future or at most today. |
Having this “cheat sheet” to hand will help you identify and fix problems before they become a real obstacle to your financial management.
Taking a proactive approach and relying on tools that validate data during SEPA document creation will not only save you bank rejections. It will free your finance team from repetitive, frustrating tasks so they can focus on what really adds value.
How to automate SEPA document creation with an API
For companies that have already moved past generating files from a spreadsheet, automation via an API is the next big step. Here we are no longer talking about converting a file manually; it is about integrating SEPA document creation directly into the core of your management systems—your ERP or CRM.
An API (Application Programming Interface) is, in essence, a communication bridge between two programs. In this context, it lets your own software connect to a service like ConversorSEPA to ask it to create an XML file on the spot, without anyone having to click a button.
This approach removes the human factor from the process entirely. Imagine your billing system issues a new direct debit. Automatically, it sends the data through the API and, in seconds, receives the validated SEPA XML file back, ready to be included in the next batch you send to the bank.
Direct benefits of API integration
The difference between manual conversion and automation with an API is like comparing sending a letter by post with sending an email. Speed, reliability and the ability to handle more operations completely change the game.
The clearest benefits are:
- Elimination of human error: With no one typing data or copying and pasting, the risk of mistakes in amounts, IBANs or dates drops practically to zero.
- Handling large volumes: It allows you to process thousands of transactions per day without breaking a sweat. This is essential for growing businesses or those with very marked peaks in activity.
- Real-time efficiency: Files are generated exactly when they are needed, which gives finance and admin teams tremendous agility.
Automation with an API is not just a process improvement; it is a scaling strategy. It lets companies handle exponential growth in their operations without having to expand their admin team, freeing people to focus on higher-value tasks.
How this integration works in practice
Getting a solution like this up and running is simpler than it seems, especially if you have a development team. A good conversion service will always offer clear documentation and code examples that make the connection much easier. In general, the process can be summarised in a few steps.
- Your system gathers the data: Your ERP or CRM collects all the information needed for a batch (client name, IBAN, amount, reference, etc.).
- It makes an API call: Your software sends that data in a structured format (usually JSON) to the conversion service.
- The service processes and validates: The external platform receives the information, checks that everything is correct and generates the SEPA document in XML format, complying with all regulations.
- You receive the file ready: The API returns the XML file to your system, which can save it or send it directly to the bank’s platform.
This cycle, which takes just seconds, completely transforms cash flow management. For technical teams who want to go deeper, you can find detailed information on how to use the ConversorSEPA API to better understand its capabilities. It is, without doubt, the definitive solution for growing your financial operations safely and efficiently.
We answer your last questions about the SEPA document
To round off this guide, we will address the questions that almost always arise when you start working with the SEPA document. Here you have clear, direct answers so you can resolve any remaining doubts.
Do I need special software to open an XML file?
The short answer is no. In essence, an XML file is nothing more than a plain text file. You could open it without any problem with Notepad on your computer or even drag it into a browser tab.
What you will find inside, however, is not exactly pleasant reading. You will see code full of tags and a structure designed for machines (the bank’s systems) to understand, not people. The key is not being able to read it yourself but ensuring its structure is 100% correct so your bank processes it without complaint.
What is the difference between the CORE and B2B schemes?
This is one of the most important questions, and the answer depends entirely on who you are collecting from.
- CORE scheme: The most common and versatile. It works for issuing direct debits to any type of client: individuals, self-employed or companies. Its main feature is that it strongly protects the consumer, allowing them to return a direct debit (even if they had authorised it) within 8 weeks.
- B2B scheme (Business-to-Business): As the name suggests, it is exclusive to operations between companies or the self-employed. The great advantage is that once the debtor has authorised the mandate, the collection is final and cannot be returned. This gives you total collection security.
Understanding this well is essential for managing risk. The CORE scheme is more flexible for your client, but B2B protects your income against non-payment or unexpected returns, so it is ideal for important commercial agreements.
Can I edit a SEPA XML file by hand?
Technically, yes. But honestly, it is a very bad and risky idea. A tiny mistake—such as accidentally deleting a closing tag (e.g. </Amt>) or typing a wrong character—can invalidate the entire file. The result: the bank will reject it and you will have to start from scratch.
If you need to make a correction, the safe path is always the same: change the data in your original Excel or CSV and regenerate the SEPA document with a trusted tool. That way you ensure the final file keeps its integrity and works first time.
Simplify and automate the creation of your batches with ConversorSEPA. Turn your spreadsheets into validated SEPA files ready for your bank in seconds. Try our tool for free and say goodbye to manual errors.